12/13/2012

Windows Server 2012 DirectAccess Full Real world implementation Example (Basic installation, Configuration, NLS,SSL,IPHTTPS, WNLOADBALANCING,......)


Coming Soon !

10/24/2012

DirectAccess for Windows Server 2012 Installation & Configuration Guide

This guide will explain how to install and configure DirectAccess on a Windows Server 2012 behind a NAT router with one adapter. To keep this guide as simple as possible, I will not explain the different steps and why it must be like that. Simply follow the guide and you will have a working DirectAccess, or should at least.

Prerequisites

If you are following this guide, you will need:
- A domain administrator. For this guide I am always logged in as a domain administrator.
- A domain controller
- A Remote Access server (also called DirectAccess)
- One public IP
- An external DNS record that points to your public IP. I used DynDNS.
- If behind a NAT device, forward port 443 from your public IP to the Remote Access server (internal IP)
DynDNS is free for two weeks, so give it a try. Edit: Someone mentioned freedns.afraid.org which is completely free, and is actually easier to use! Make a new account and click add a subnet!

Setup

All my servers are running Windows 2012, and all my clients are running Windows 8. This guide is for Windows 8 clients, and will be edited soon to support Windows 7 clients. I just want to see DirectAccess work! I do not have a PKI nor do I have a NLS (for those who have worked with DirectAccess before, you know what this is.)
I have one domain controller and one Remote Access server. That’s it. My domain is called syscomworld.local, and everything is behind a NAT router. The firewall is very strict here. Both servers are actually virtual machines running on the same physical machine.

Installation

Open Server Manager and click add server roles. Scroll down to Remote Access and install it with the default settings.

Configuration

Before we configure Remote Access, we will have to do a couple of things:
- Make a security group in Active Directory. Mine is called DA_Klienter. Your client machine has to be a member of the domain and the security group.
- Make sure your firewall is correctly configured. Port 443 has to be open, and your external IP should be forwarded to your Remote Access server.
- Remove ISATAP from the global blocking list on the domaincontroller, you can do this by running this command
dnscmd /config /globalqueryblocklist wpad
Open Remote Access Management from the metro menu. In the console, click Run the Getting Started Wizard and choose deploy DirectAccess and VPN. Select behind a NAT device with a single adapter and type in your external DNS.

Step 1

Let us start by configuring step 1. This guide will deploy full DirectAccess for clients and remote management.


Remove Domain Computers and add the security group you made earlier. Since my clients are virtual machines, I have to uncheck Enable DirectAccess for mobile computers only.

In this lab, I will not be setting up a helpdesk. Choose an appropriate name for DirectAccess, I went for SyscomVPN. This will show up on the clients when the user clicks on Network to log into a wireless network.

Step 2

Move over to step two. Companies that looked into DirectAccess and decided not to implement it into their system probably did so because DirectAccess required a specific topology to work. Now we have three different choices, where I find behind an edge device (with a single adapter) the easiest one. Insert your external DNS (I do like pie) you made with DynDNS and click Next.

Certificates has become significally easier to handle (for windows 8 clients that is). I will bring up later on how to make this work for Windows 7 clients. Check the box Use a self-signed certificate created automatically by DirectAccess.

My clients will be logging in with their Active Directory credentials. If you look at the bottom, you will see where we need to check if we want Windows 7 clients to use this configuration. If I enable this, I will have to insert a certificate on the NLS, which I do not want to at this moment.

Step 3

I will be deploying the NLS on the Remote Access server. However, the NLS should, and is recommended, be deployed on a different server. For now, check the mark the network location server is deployed on the Remote Access server. This will be using a self-signed certificate.
Click next until you finish the wizard.

Step 4

If you do not want DirectAccess users to access certain servers, you can make a security group in AD that contains those servers you want them to be able to access. Since this is a lab environment, I just clicked Finish with the default settings.
Now we are done with all the steps, click Finish, which you will find at the bottom right hand side of the configuration page.
Review of all the settings we just configured. Click apply when done looking it over.
Open the Dashboard page and wait until you see green checkmarks popping up. You might have to click refresh now and then.

Test a Win8 client

If the client already is a member of the domain, logg out and back in again. The client will then configure itself to use DirectAccess because it says so in the GPO.
When logged in, open your desktop and check Available Networks. You should see an extra connection there, that’s your DirectAccess. I called mine for SyscomVPN (you change the name in Step 1).
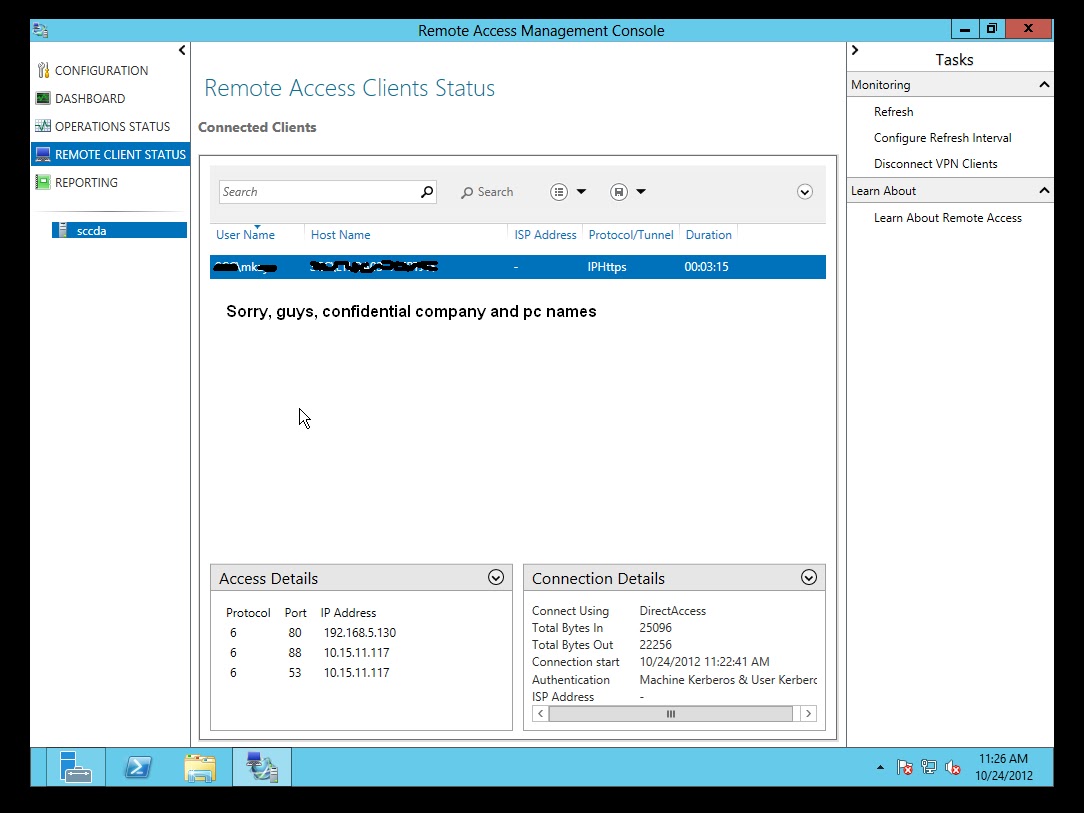
My client is connected to the domain right now. When outside the domain, it will say Connected (or Connecting if it doesn’t work). You can get the logs if you right click it, so no need for DirectAccess Connectivity Assistant anymore.
I just used my cellphone to test if this worked.

If it is working, then you can test this by making a shared folder on one of the servers and see if you can access it outside the domain.

Direct Access on the Client-Windows 8 side screenshots.


Direct Access on Windows Server 2012 with Windows 8 Client Screenshots (configured by me in real world) 


10/07/2012

IPSec Modes: Transport and Tunnel

Comparing Transport and Tunnel Modes

The bottom line in understanding the difference between these two is this: tunnel mode protects the original IP datagram as a whole, header and all, while transport mode does not. Thus, in general terms, the order of the headers is as follows:

  • Transport Mode: IP header, IPSec headers (AH and/or ESP), IP payload (including transport header).

  • Tunnel Mode: New IP header, IPSec headers (AH and/or ESP), old IP header, IP payload.

Again, this is a simplified view of how IPSec datagrams are constructed; the reality is significantly more complex. The exact way that the headers are arranged in an IPSec datagram in both transport and tunnel modes depends on which version of IP is being used; IPv6 uses extension headers which must be arranged in a particular way when IPSec is used. The header placement also depends on which IPSec protocol is being used: AH or ESP. Note that it is also possible to apply both AH and ESP to the same datagram; if so, the AH header always appears before the ESP header.

There are thus three variables and eight basic combinations of mode (tunnel or transport), IP version (IPv4 or IPv6) and protocol (AH or ESP). The two topics on AH and ESP describe the four format combinations of transport/tunnel mode and IPv4/IPv6 applicable to each protocol. Note that ESP also includes an ESP trailer that goes after the data protected.

You could probably tell by reading these descriptions how the two modes relate to the choice of IPSec architecture from the preceding topic. Transport mode requires that IPSec be integrated into IP, because AH/ESP must be applied as the original IP packaging is performed on the transport layer message. This is often the choice for implementations requiring end-to-end security with hosts that run IPSec directly.

Tunnel mode represents an encapsulation of IP within the combination of IP+IPSec. Thus, it corresponds with the BITS and BITW implementations, where IPSec is applied after IP has processed higher-layer messages and already added its header. Tunnel mode is a common choice for VPN implementations, which are based on tunneling of IP datagrams through an unsecured network such as the Internet.

Key Concept: IPSec has two basic modes of operation. In transport mode, IPSec AH and/or ESP headers are added as the original IP datagram is created; this mode is associated with integrated IPSec architectures. In tunnel mode, the original IP datagram is created normally, then the entire datagram is encapsulated into a new IP datagram containing the AH/ESP IPSec headers. This mode is most commonly used with “Bump In The Stack” and “Bump In The Wire” implementations.

Additional Deployment Options and Considerations

Force Tunneling, PKI, Smart-Card with DirectAccess  from Technet
           

By default, remote DirectAccess clients are able to access the Internet, the intranet, and their local subnet simultaneously. DirectAccess clients are configured to send all intranet name query requests to their intranet DNS servers, and unrecognized or exemption name query requests to their ISP’s DNS servers. This is the default and recommended operating mode of DirectAccess.
To force all of your intranet and Internet traffic to flow through the DirectAccess connection, you can use Force Tunneling. You can enable Force Tunneling with the following Group Policy setting on the Group Policy object for your DirectAccess clients:
Computer Configuration\Administrative Templates\Network\Network Connections\Route all traffic through the internal network
When Force Tunneling is enabled, all traffic from the DirectAccess client must be IPv6 traffic and will be routed to the intranet over an IP-HTTPS tunnel. Force Tunneling-enabled clients will still be able to access any resources on their local subnet, such as network printers, but any network traffic beyond the local subnet must be IPv6 traffic.
To reach resources on the IPv4 Internet when Force Tunneling is enabled, use an IPv6-capable Web proxy server. Alternately, you can use NAT-PT device on your intranet and route the resulting IPv4 Internet traffic to your IPv4-based Web proxy servers. To reach these resources for IPv4 Internet traffic, you must configure the following additional NRPT rule in the DirectAccess Setup Wizard:
  • Name suffix set to “.
  • DNS server IPv4 or IPv6 addresses set to the IPv6-capable proxy server or NAT-PT
noteNote
Due to the infrastructure requirements and reduced performance for accessing IPv4 Internet resources, Microsoft does not recommend the use of Force Tunneling for DirectAccess.

With DirectAccess, IT staff has the ability to remotely administer DirectAccess client computers. This might include pushing out security updates, retrieving hardware and software inventory reports, installing application updates, or even helping a user perform a complex task with Remote Desktop. Since DirectAccess client communications use IPv6 exclusively, any application an administrator uses to connect to a remote DirectAccess client must be IPv6-enabled.
Additionally, when an administrator uses an application that connects to a DirectAccess client using Teredo as the transition technology for sending IPv6 traffic over the IPv4 Internet, a firewall rule for that application with the Edge Traversal flag enabled needs to be configured on the client computer. You can set this flag in the following ways:
  • Use the Windows Firewall with Advanced Security snap-in (within the Group Policy object). Obtain properties of an inbound rule, click the Advanced tab, and then select Allow edge traversal in Edge traversal.
  • Use the edge=yes option for the netsh advfirewall firewall command when adding or changing an inbound rule.
For a computer that is being managed to be reachable over Teredo, ensure that the computer has an inbound ICMPv6 Echo request allow rule with edge traversal enabled. The Netsh.exe command for this rule is the following:
 
netsh advfirewall firewall add rule name="Inbound ICMPv6 Echo request with Edge traversal" protocol=icmpv6:128,any dir=in action=allow edge=yes profile=public,private
Here is an example of how a Remote Desktop rule with edge traversal can be enabled using a Netsh.exe command:
 
netsh advfirewall firewall add rule name=”remote desktop” profile=public,private dir=in program=system action=allow protocol=tcp localport=3389 edge=yes remoteip=<Corp v6 range>
To further ensure that the remote desktop connection is authenticated and encrypted, add the following rule, which uses the security keyword
 
netsh advfirewall firewall add rule name=”remote desktop” profile=public,private dir=in program=system action=allow protocol=tcp localport=3389 security=authenc edge=yes remoteip=<Corp v6 range>

To use this setting, you need to ensure that there is a transport mode IPsec policy that secures the connection between the management server and the client.
noteNote
If the computer that is managing a DirectAccess client from the intranet is running Windows Vista or Windows Server 2008 and IPsec transport mode is required between the managing computer and the DirectAccess client, both computers must have the same quick mode lifetimes.

If your DirectAccess policies are configured using server names instead of IP addresses, the Teredo server, 6to4 Relay, and IP-HTTPS server names must all be resolvable from the public Internet namespace. These servers may all be physically located on the same server, in which case only a single name needs to be made available. If these server names are not resolvable from outside your organization, DirectAccess users will not be able to connect from the Intranet.
As an alternative, DirectAccess policies can be configured using IP addresses for the Teredo server, 6to4 Relay, and IP-HTTPS server, in which case these server names do not need to be publicly resolvable.
noteNote
By default, the DirectAccess Setup Wizard configures the 6to4 relay and the Teredo server with an IPv4 address and the IP-HTTPS server with an FQDN.

Depending on the application being used, DirectAccess clients can communicate directly with other DirectAccess clients, even when outside of the intranet. Applications that allow clients to connect directly from one to another are broadly referred to as Peer-to-Peer (P2P) applications.
Many P2P applications provide their own built in security, such as Groove or Office Communicator. Some applications do not provide any additional security. Remote Assistance, Remote Desktop, and File and Printer Sharing are in this category. By leveraging IPsec, DirectAccess allows these applications to communicate securely even when they lack their own security mechanisms.
To secure connectivity for specific applications:
  • Create an IPsec transport mode rule and associated firewall rules for each application you wish to secure using the following general policy guidelines: Transport mode, RequestinRequestout, Non-Corp v6 <=> Non-Corp v6 , Auth = Computer certificate, Profile=public, private
  • Create Windows firewall rules for each application. For example, for Remote Desktop, the Windows Firewall rule would look like the following: Profile= Public, Private; Program = c:\windows\system32\mstsc.exe; Allow if secure + encryption; Inbound; TCP 3389
To configure the IPsec rule using Netsh.exe, you can use the following format:
 
netsh advfirewall consec add rule endpoint1=<Non-Corp v6> endpoint2=<Non-Corp v6> action=requestinrequestout profile=public,private auth1=computercert auth1ca=<CA Name>

To configure the Windows Firewall rule using Netsh.exe, you can use the following format:
 
netsh advfirewall firewall add rule name=”remote desktop” profile=public,private program=system action=allow security=authenc protocol=tcp localport=3389

Finally, additional security can be configured to prevent communication between DirectAccess clients unless the traffic is secured. This is accomplished by modifying the action on the connection security rule for action=requireinrequestout, which will result in the host dropping any connections from IPv6 hosts that are not encrypted.
Outgoing connections to other DirectAccess clients will be secured regardless of the application. Outgoing connections to Internet and non-DirectAccess clients will result in successful unprotected communication.
To increase the number of concurrent authentication calls in progress at one time between the DirectAccess server and the domain controller, set the HKEY_LOCAL_MACHINE\SYSTEM\CurrentControlSet\Services\Netlogon\Parameters\ MaxConcurrentApi (REG_DWORD) registry value to 5, and then restart the NETLOGON service.
If you do not specify management servers, there are two IPsec tunnel mode rules in a default DirectAccess configuration as configured by the DirectAccess Setup Wizard:
  • The first tunnel is from the DirectAccess client to the DirectAccess server to support access to the IPv6 addresses of DNS servers and AD DS domain controllers.

    This tunnel uses Computer certificate credentials for the first authentication and User (NTLMv2) for the second authentication. User (NTLMv2) credentials are used to force the use of AuthIP and because the DirectAccess client needs DNS and domain controller access before it can use Kerberos credentials for the second tunnel.
  • The second tunnel is from the client to the DirectAccess server to support access to the IPv6 address space of the intranet.

    This tunnel uses Computer certificate credentials for the first authentication and User (Kerberos V5) for the second authentication.
Additionally, IPsec tunnel mode settings can be used to require smart card-based authorization for remote users by the DirectAccess server. This IPsec tunnel authorization can be used specifically to require smart cards for remote DirectAccess connectivity. IPsec authorization is an extended setting on IPsec tunnels that enforces authorization for specific computer or user security groups by enforcing the existence of a specific Kerberos-related security identifier (SID) that is generated when a user logs on with a smart card.
IPsec authorization for requiring smart cards should only be configured on the tunnel that is used to provide access to the intranet (the second tunnel previously described), not on the tunnels that are used for DNS and domain controller or management server access. DirectAccess clients require access to the core domain infrastructure to validate their credentials, including their smart card credentials. These credentials are then used to gain access to the rest of the intranet using the second IPsec tunnel.
To use smart cards with IPsec tunnel mode authorization, you must first have a PKI deployment and client smart card infrastructure.
After the PKI and smart card infrastructure is in place, you add global IPsec tunnel mode authorization settings to the Group Policy object for the DirectAccess server, specifying the authorization identifier for smart card logons.
The way smart card enforcement works with IPsec authorization is that IPsec can be configured to look for specific Kerberos-based SIDs in a client’s Kerberos token. IPsec is configured to enforce Kerberos-based user authentication and is also configured to look for specific authorized users. For smart card enforcement, the authorized user is actually a well-known SID (S-1-5-65-1) that maps to smart card-based logons. This SID is referred to as “This Organization Certificate” when it is configured in the global tunnel mode authorization settings.
When smart card authorization is enforced at the edge by using an IPsec authorization policy and a user logs in without a smart card, a message displays in the notification area. The following figure shows an example:
baf96b3c-e61a-4e08-9b5d-6ed922965f4f
Users can click this message and provide their smart cards and PINs to gain access to intranet resources.
You can require users of DirectAccess client computers to provide their smart card credentials before allowing access to intranet resources by selecting the Require smart card login for users check box on the Connectivity page of Step 2 of the DirectAccess Setup Wizard. The following figure shows an example:
550e5f17-b49b-4a3e-bfe1-5923c89848f9
The following figure shows an example of the global IPsec tunnel mode authorization setting when you select the Require smart card login for users check box in the DirectAccess Setup Wizard.
24b99f33-773f-4955-aab0-db4cc5c7ad6d
To view this dialog box in the Windows Firewall with Advanced Security snap-in, do the following:
  1. Right-click Windows Firewall with Advanced Security, and then click Properties.
  2. On the IP Settings tab, in IPsec tunnel authorization, click Customize.
  3. Click the Users tab.
To perform the equivalent configuration of the DirectAccess Setup Wizard with the Netsh.exe tool, use the following commands:
 
netsh advfirewall consec add rule name=”Smart card tunnel” endpoint1=Intranet IPv6 address space endpoint2=Any localtunnelendpoint=DirectAccess server IPv6 address 2 remotetunnelendpoint=any auth1=Computercert auth1ca=”Certificate Auth name certmapping:yes” auth2=userkerb applyauthz=yes
 
netsh advfirewall set global ipsec authzusergrp=O:LSD:(A;;CC;;;S-1-5-65-1)
If you need to lock out a DirectAccess client and prevent it from making DirectAccess connections, you can do so by disabling the computer account in Active Directory. This is the recommended method.
Another method is to enable strong CRL checking for IPsec and then revoke the DirectAccess client’s certificate, preventing authentication with the DirectAccess server. Strong CRL checking is not enabled by default; if you revoke a computer certificate of a DirectAccess client, it will still be able to make authenticated connections to the DirectAccess server.
To enable strong CRL checking for IPsec authentication, use the following procedure:
  1. On the domain controller, run the following commands:
     
    netsh adv set store gpo=[domain name]\[GUID for the DirectAccess server GPO]
    
    netsh adv set global ipsec strongcrlcheck 2
  2. On the DirectAccess server, use the gpupdate /target:computer command to update computer configuration Group Policy settings.
noteNote
If you enable strong CRL checking and the DirectAccess server cannot reach the CRL distribution point, IPsec authentication for all DirectAccess connections will fail.
If you are using NAP and health certificates and you enable strong CRL checking, IPsec authentication for all DirectAccess connections will fail. Health certificates do not have CRLs because their lifetime is typically on the order of hours, instead of years for typical computer certificates.

Set the Group Policy setting for Computer Configuration\Policies\Administrative Templates\Windows Components\Internet Explorer\Internet Control Panel\Security Page\Turn on automatic detection of the intranet to Disabled. This disables the ability of Internet Explorer® to leak NTLM credentials by default when single-label names are used. You can set the setting in the Group Policy object (GPO), never prompt, to prevent NTLM from being used in the Internet or Local Intranet Zone entirely. List the known intranet sites in the Trusted Sites Zone.
Enable the setting to prevent elevation to Local Intranet Zone from Internet Zone.

IPv6 Dictionary  for DirectAccess  from technet

Connectivity

DirectAccess clients maintain constant connectivity with the intranet, and Internet Protocol version 6 (IPv6) provides the end-to-end addressing necessary to accomplish this. Since many organizations do not have IPv6 deployed, DirectAccess includes IPv6 transition technologies to help ensure IPv6 connectivity. For more information, see IPv6 on the Microsoft Web site.
Teredo, 6to4, and the Intra-Site Automatic Tunnel Addressing Protocol (ISATAP) are examples of IPv6 transition technologies. These technologies allow you to use IPv6 even if your DirectAccess clients are on the IPv4 Internet and your network infrastructure does not yet support native IPv6 routing. IPv6 transition technologies can simplify and reduce the costs of an IPv6 deployment. For more information, see IPv6 Transition Technologies.
The following table lists possible DirectAccess client configurations and their corresponding method of sending IPv6 traffic to the DirectAccess server. These methods are discussed in the following sections.

If the client is assigned: Preferred connectivity method:
Globally routable IPv6 addressGlobally routable IPv6 address
Public IPv4 address6to4
Private (NAT) IPv4 addressTeredo
If the client cannot connect through the previous methodsIP-HTTPS
IP-HTTPS is typically used only if the client is unable to connect to the DirectAccess server using the other IPv6 connectivity methods or if Force Tunneling has been enabled.
noteNote
ISATAP may also be used to provide IPv6 connectivity when the client is at a remote location. ISATAP deployments can either connect to the IPv6 Internet or use 6to4 to transfer IPv6 traffic across the IPv4 Internet.

6to4 (defined in RFC 3056) is an IPv6 transition technology that provides IPv6 connectivity across the IPv4 Internet for hosts or sites that have a public IPv4 address. For more information, see IPv6 Transition Technologies.
Teredo (defined in RFC 4380) is an IPv6 transition technology that provides IPv6 connectivity across the IPv4 Internet for hosts that are located behind an IPv4 network address translation (NAT) device and are assigned a private IPv4 address. For more information, see Teredo Overview.
IP-HTTPS is a new protocol for Windows 7 and Windows Server 2008 R2 that allows hosts behind a Web proxy server or firewall to establish connectivity by tunneling IPv6 packets inside an IPv4-based HTTPS session. HTTPS is used instead of HTTP so that Web proxy servers will not attempt to examine the data stream and terminate the connection.
Performance of IP-HTTPS may not be as good as the other DirectAccess connection protocols. There are multiple steps that can be taken to improve performance. For example, additional IP-HTTPS servers can be added and load-balanced. IPsec encryption between the DirectAccess client and DirectAccess server can be disabled to further improve performance of this protocol. Microsoft® is looking at additional ways to improve the performance of this protocol in future versions of Windows.
For the details of IP-HTTPS, see the IP over HTTPS (IP-HTTPS) Tunneling Protocol Specification.
noteNote
To use IP-HTTPS diagnostics to troubleshoot IP-HTTPS connectivity problems, you must configure firewall rules to allow the IP-HTTPS server to respond to Echo Request messages.

DirectAccess clients can only communicate with intranet servers and resources that are reachable with IPv6. There are three ways to achieve this intranet IPv6 connectivity:
  • Configure your intranet routing infrastructure to support native IPv6. Intranet servers and applications that support IPv6 are then reachable. Computers running Windows Vista®, Windows Server 2008, Windows 7, and Windows Server 2008 R2 are configured to use IPv6 by default. Although few organizations today have a native IPv6 infrastructure, this is the preferred and recommended connectivity method. Although not technically required for DirectAccess, organizations should begin planning for a native IPv6 infrastructure.
  • Deploy ISATAP on your intranet. Even without a native IPv6 infrastructure, you can use ISATAP to make intranet servers and applications reachable by tunneling IPv6 traffic over your IPv4-only intranet. Computers running Windows Vista, Windows Server 2008, Windows 7, and Windows Server 2008 R2 support ISATAP host functionality.
  • Deploy Network Address Translation–Protocol Translation (NAT-PT) devices on your intranet. NAT-PTs perform IPv6/IPv4 translation services for traffic between your DirectAccess clients that are using IPv6 and intranet servers and applications that can only use IPv4.
noteNote
Without a NAT-PT device, IPv4-only resources on your network cannot be reached by DirectAccess clients. The workaround is to use a VPN connection.

ISATAP (RFC 4214) is an IPv6 transition technology that is used to provide IPv6 connectivity between IPv6/IPv4 hosts across an IPv4-only intranet. ISATAP can be used for DirectAccess to provide IPv6 connectivity to ISATAP hosts across your intranet.
For more information about ISATAP, see IPv6 Transition Technologies.
A NAT-PT device (RFC 2766) can be deployed to make IPv4-only resources on your intranet available to DirectAccess clients. A NAT-PT is typically configured to provide coverage for a particular DNS namespace. Once deployed, the NAT-PT will make the necessary IPv6-to-IPv4 translations, allowing DirectAccess clients to access any IPv4-only resources located within that namespace.
Although Windows Server 2003 includes the IPv6 protocol, many built-in applications and system services do not support IPv6. Therefore, a NAT-PT device is typically required to reach resources that are running on servers running Windows Server 2003. Additionally, resources on servers running non-Windows operating systems need a NAT-PT unless the server and its applications support IPv6 connectivity.
Because Windows Server 2008 R2 does not provide NAT-PT functionality, the configuration of NAT-PT is beyond the scope of this paper. NAT-PT devices are typically available from Layer 2 and Layer 3 switch and router vendors.
To separate Internet traffic from intranet traffic, Windows 7 includes the Name Resolution Policy Table (NRPT), a new feature that allows the following:
  • DNS servers can be defined per DNS namespace rather than per interface.
  • DNS queries for specific namespaces can be optionally secured using IPsec (and other actions can be specified).
The NRPT stores a list of DNS namespaces and corresponding configuration settings that define the DNS client’s behavior for that namespace. While a DirectAccess client is remote, each name query request is compared against the namespaces stored in the NRPT. If a match is found, the request is processed according to the settings in the NRPT entry. The settings determine whether that query will be encrypted (to protect from packet sniffing and other man-in-the-middle attacks) and which DNS servers to which the request will be sent.
If a name query request does not match a namespace listed in the NRPT, it is sent to the DNS servers configured in the TCP/IP settings for the specified network interface. For a remote client, this will typically be the Internet DNS servers as configured through the Internet service provider (ISP). For a DirectAccess client on the intranet, this will typically be the intranet DNS servers as configured through DHCP.
Single-label names, such as http://internal, will typically have configured DNS search suffixes appended to the name before they are checked against the NRPT. If no DNS search suffixes are configured and the single-label name does not match any other single-label name entries in the NRPT, the request will be sent to the DNS servers specified in the client’s TCP/IP settings.
Namespaces, such as .internal.contoso.com, are entered into the NRPT followed by the DNS servers to which requests matching that namespace should be directed. If an IP address is entered for the DNS server, then all DNS requests will be sent directly to the DNS server over the DirectAccess connection. There is no need to specify any additional security for this configuration.
However, if a name is specified for the DNS server (such as dns.contoso.com) in the NRPT, then that name must be publicly resolvable when the client queries the DNS servers specified in its TCP/IP settings. To prevent an attacker from hijacking this external name query request and injecting a bogus reply, enabling IPsec protection is strongly recommended in this configuration.
The NRPT allows DirectAccess clients to use intranet DNS servers for name resolution (dedicated DNS servers are not required). DirectAccess is designed to prevent the exposure of your intranet namespace to the Internet.
There are some names that need to be treated differently from all others with regards to name resolution; these names must not be resolved using intranet DNS servers. To ensure that these names are resolved with the DNS servers specified in the client’s TCP/IP settings, you must add them as NRPT exemptions.
If no DNS server addresses are specified in the NRPT entry, the entry is an exemption. If a DNS name matches an entry in the NRPT that does not contain addresses of DNS servers or does not match an entry in the NRPT, the DirectAccess client sends the name query to the DNS servers specified in the client’s TCP/IP settings.
If any of the following servers have a name suffix that matches an NRPT entry for the intranet namespace, that server name must be an NRPT exemption:
  • WPAD servers
  • Network location servers
  • All quarantine servers
These servers must always be resolved with the DNS servers specified in the client’s TCP/IP settings.
Because DirectAccess clients rely on the NRPT to determine whether the FQDN of a server name should be sent to an intranet or Internet DNS server, proper configuration of domain suffixes is very important for reliable DirectAccess operation. Before setting up DirectAccess, ensure that DirectAccess clients are configured with DNS search suffixes for all of the domains containing the servers that users on DirectAccess clients will access.
The Windows Internet Name Service (WINS) is an IPv4-only name resolution service. If your organization does not deploy NAT-PT, DirectAccess clients should not use WINS as a fallback name resolution mechanism. At this time, the DNS servers used by remote DirectAccess clients should not have WINS forwarding enabled. Additional details will be released before the release of Windows 7 and Windows Server 2008 R2 providing the best practice for configuring DA clients to utilize WINS servers if NAT-PT devices are present.

UAG DirectAccess (IPv6 and DirectAccess)  from technet blogs

 
DirectAccess and IPv6
DirectAccess uses IPv6 for remote access. The reason behind it is that DirectAccess tries to look two steps ahead when thinking about remote access. Given the fact that public IPv4 addresses are running out, let’s consider the following scenario (outlined in the figure below). We have a client that is in one private network (in our case it contains S2 and Client), and it needs to have seamless remote access to another private network (in our case, the other network contains S1). Because both networks are using the same private IPv4 address space, IPv4 traffic is not routable between them, so we have an irresolvable conflict (In a classic IPv4 VPN scenario, the client can manually chose to connect to a VPN to access S1, but that is not seamless access).
image
In DirectAccess since the client is IPv6 based, it can access both S1 and S2. That is possible because from an IPv6 point of view all machines have unique IPv6 addresses. When the private network containing S1 is behind a UAG DirectAccess server (which is acts as a NAT64) the client would access S1 using S1's globally unique IPv6 address (intercepted by the NAT64). Local resources such as S2 would be accessible using IPv4 (or IPv6 if the network is IPv6 compatible). Here as you can see the client seamlessly accesses the network containing S1.
I’m not saying that the world will move instantaneously to IPv6, but when you plan remote connectivity for your organization you might start thinking about integrating IPv6 enabling technologies such as DirectAccess.
This is why today I want to focus on the how DirectAccess relates to IPv6 addresses in your organizational network.

A quick introduction to IPv6 addresses

I guess IPv6 is a very long subject which can’t be fully addressed in a blog post. I do however want to give a quick introduction to IPv6 addresses and prefixes. IPv6 addresses and prefixes were the hardest part for me when I moved to the DirectAccess realm. I just had to start looking at IPv6 addresses. I was quite shocked by the fact that they were 128 bits long, and I still have trouble comprehending this.
A useful thing I learned was that for many practical reasons for unicast addresses, you can look at the first 64 bits of an address and learn a lot. The rest of the bits, are well, less important… To be more specific, a given subnet is represented by the first 64 bits, the next 64 bits represent a computer in that given subnet.
When I look at the first 64 bits of a unicast IPv6 address inside an organization network I can usually categorize it into one of the following:
(The list below refers to prefixes. Prefixes are a list of hexadecimal digits, separated by colons, and followed by a forward slash, and the number of high-order bits in the prefix, pretty much like IPv4 subnet definition, e.g. 192.168.17.0/24 means the first 24 bits set to 192.168.17 (converted to binary) and 2002:836B:1::/48 means the first 48 bits equal 2002:836B:0001 (converted to binary).)
1. 2002:WWXX:YYZZ::/48
  • This is called 6to4 address space
    • It means you own a public IPv4 address, and you're using it to generate a 6to4 prefix.
      • WWXX:YYZZ is the colon hexadecimal representation of w.x.y.z, which is the public IPv4 address you must own.
  • It also implies you have (somewhere) a Window-based server that owns that w.x.y.z, which has assigned itself the following IPv6 address 2002:WWXX:YYZZ::WWXX:YYZZ
    • That server is called a 6to4 router.
    • It has a 6to4 router mechanism that enables it to route IPv6 traffic over the IPv4 internet using its IPv4 address (w.x.y.z).
    • Advanced note: If that server has other means of connecting to the IPv6 Internet, it is called a 6to4 relay.
  • The UAG DirectAccess Server acts as a 6to4 router and relay, and in some cases uses the 6to4 48-bit address space for addressing (I will explain shortly)
2. FD00::/8 (called unique local addresses, works according to the following RFC)
  • This means that the owner generated a random 48-bit IPv6 address space (he picked a random 40 bit number and appended it to FD00::/8)
    • Although these addresses are legal, they are not globally routable, and do not provide connectivity with the IPv6 Internet.
    • You can configure UAG DirectAccess to work with these types of addresses, but using these addresses is only recommended in a lab environment, rather than for long term deployment.
3. FE80::/64
  • This is a link-local address, which is used between machines on the same subnet.
  • If these are the only IPv6 addresses you have on a machine – the chances are that the machine isn't talking IPv6 with anyone :), at least not outside its subnet.
4. 2001:0::/32
  • A client with such a prefix received its address from a Teredo server, which probably means it doesn't support native IPv6 connectivity.
    • E.g. My home machine (ISPs here don’t support IPv6 yet), Hotels, etc…
  • Organizations usually don’t use these addresses internally, since by default Windows-based Teredo clients do not use Teredo on a managed intranet…
  • UAG DirectAccess uses this address space for DirectAccess roaming clients. It acts as a Teredo server for them.
5. Other public IPv6 prefix (usually 48-bit, which usually represents a single organization)
  • The prefix should have been assigned by IANA or a local Internet service provider.
A quick “advanced” note – 6to4 and Teredo clients use 6to4 addressing and Teredo addressing. IP-HTTPS clients, ISATAP hosts, and servers behind a NAT64 don’t use a specific address schema, so when these technologies are configured, a specific prefix should be configured for them. Such a prefix is usually allocated from one of the existing schemas: 6to4, unique local, or public (options 1, 2, and 5 above).
So, when you configure UAG DirectAccess you need to configure a prefix for the NAT64, ISATAP hosts (if ISATAP is configured), and for the IP-HTTPS clients.

How UAG configures DirectAccess IPv6 prefixes

When running the UAG DirectAccess configuration you pick the Internet facing and internal facing IP addresses.
clip_image004[4]
When the Connectivity screen is displayed, behind the scenes UAG DirectAccess actually checks to see if you have IPv6 address on the internal facing UAG interface. If you do, it disables the Internal IPv4 address list box, if you don't it disables the Internal IPv6 address list box, however a lot more happens behind the scenes.
No IPv6 address on your internal facing UAG interface.
If you have an IPv4 address on the internal facing interface, DirectAccess assumes that you don’t have IPv6 deployed in your organization. It then uses the internal IPv4 address to configure the UAG DirectAccess server as an ISATAP router. If you use this option please note that Windows-based ISATAP hosts in your network can't use ISATAP until you register a DNS record of ISATAP (e.g. ISATAP.internal.contoso.com) in the DNS server (mind the Global Query Block List). Once you register the ISATAP name, Windows-based ISATAP hosts in your organization start using IPv6 and use the UAG DirectAccess server as their ISATAP router.
Behind the scenes UAG DirectAccess automatically configures the following prefixes using 6to4 notation:
    1. 2002:WWXX:YYZZ:8000::/49 as the organizational prefix
    2. 2002:WWXX:YYZZ:8000::/64 as the ISATAP prefix
    3. 2002:WWXX:YYZZ:8001::/96 as the NAT64/DNS64 prefix
    4. 2002:WWXX:YYZZ:8100::/56 as the IP-HTTPS prefix
An “advanced” note – the reason that /49 address space is used, is that the 6to4 address 2002:WWXX:YYZZ::WWXX:YYZZ is used for IPSec tunneling and cannot be part of the organizational prefix.
If there is an IPv6 address on your internal UAG interface.
This might be useful in cases where you:
    • Need a more advanced IPv6 deployment in your organization.
    • Want more control over the address allocation for remote access.
    • Are deploying a lab with a single subnet, where you use static IPv6 addresses.
If you had an IPv6 address on the internal facing interface, on the prefix configuration screen you need to enter three different IPv6 prefixes.
clip_image006[4]
  • Organization prefix
    • Here you allocate an IPv6 prefix using one of the options mentioned above (public, 6to4, or unique local) and go with it.
      • Since UAG DirectAccess uses the 6to4 server addresses to terminate IPsec tunnels, the 2002:WWXX:YYZZ::/48 prefix can’t be used as your organization prefix as it contains the UAG’s 6to4 addresses. You should use a 2002:WWXX:YYZZ:8000::/49 prefix in such a case.
        • In UAG RC0 you cannot specify a /49 prefix, please see a note below for a work around.
  • IP-HTTPS prefix
    • Here you specify a prefix with a length between 56 to 64 bits.
      • If you plan to deploy a single server you can use /64. If you plan to deploy an array, you should allocate a wider range. See the UAG documentation for more information.
  • NAT64/DNS64 prefix
    • You allocate a specific 96-bit prefix for your legacy IPv4 servers. The DNS64 adds an appropriate 32 bits, creating a 128-bit IPv6 address using the IPv4 address of the server.
Note ISATAP is not needed if an IPv6 address is present on the internal facing interface, hence no ISATAP prefix is required.
A work around for using 6to4 prefix in RC0
In UAG RC0 you are required to specify a 48-bit prefix for your organization. If you decide to go with 6to4 addressing, you should configure a third public IPv4 address on the Internet interface of the UAG machine (let's say w.x.y.t). After you do that a third 6to4 address is generated on the 6to4 interface of the UAG DirectAccess server. The new IPv6 address (2002:WWXX:YYTT::WWXX:YYTT) isn’t used for IPSec tunnel termination, and you should now use the new 2002:WWXX:YYTT::/48 prefix as the corporate 48 bit prefix.
An “advanced” comment: The reason the third public IPv4 address needs to be on the UAG Internet-facing interface, is so that DirectAccess 6to4 clients that want to access the organization 6to4 prefix, will try to connect to the IPv4 address derived from the 6to4 prefix (in our case w.x.y.t), and we need the UAG to listen for 6to4 traffic on that IP address.

Ben

DirectAccess – NAT64 and DNS64 In Action  from technet blogs

In the previous posts my colleague Ben provided an overview of Forefront UAG DirectAccess and its NAT64 and how it is different from NAT-PT. In this post I will show a step-by-step example of how UAG DirectAccess NAT64 and DNS64 work together to provide DirectAccess users access to IPv4 machines on the corporate network.
Step 1: Client DNS query
It all starts when the DirectAccess client sends a DNS query to the UAG DNS64 to get the address of an application server. It is important to note that DirectAccess clients have connectivity to the corporate network only over IPv6, therefore their DNS queries are always IPv6 DNS queries that are called “AAAA” (quad A). For more details on DNS resolution with IPv6 see here.
All clients’ DNS queries for corporate destinations are assigned to UAG DNS64 because UAG alters the clients’ Name Resolution Policy Table (NRPT) via its group policy. For more explanation on how NRPT works, see here. The NRPT table is configured with the list of corporate domains (“contoso.com” in the example below) and the DNS associated with them. It is configured in the DNS suffixes page in the UAG DirectAccess infrastructure servers wizard.
In our examples “contoso.com” is the domain suffix, 2002:c00a:a02::c00a:a02 is the DNS64 address and “inout.contoso.com” is the network location server:
clip_image002
In the first step of the example, the client tries to find the IP address of a server called x.contoso.com:
image
Step 2: DNS64 query
After it got the query from the client the UAG DNS64 sends two DNS queries: an IPv4 query (A query) and an IPv6 query (AAAA query) to the corporate DNS. UAG locates the corporate DNS servers based on its own DNS configuration.
image
Step 3: DNS Response
After DNS64 gets the responses from the corporate DNS server it decides which address to return to the client:
  • If DNS64 got in the response an IPv6 address (AAAA Response) then the application server has IPv6 connectivity so DNS64 returns this address to the client. Please note that there are cases where the DNS64 will get both IPv4 and IPv6 address. In these cases, it will return the IPv6 address.
  • If DNS64 got in response only an IPv4 address it is assumed that there is only IPv4 connectivity to this server and therefore NAT64 will have to bridge all traffic. Since the client needs an IPv6 address DNS64 generates an IPv6 address from the IPv4 address based on the NAT64 prefix configured on the UAG DirectAccess prefixes page.
In this example, x.contoso.com is an IPv4 only server that needs NAT64 to bridge all traffic:
image
UAG screen where the NAT64 prefix is configures:
image
Tip: If there is a server that has IPv6 connectivity but its applications do not support IPv6 and therefore it needs NAT64 to bridge all the traffic, you could either disable its IPv6 interfaces or prevent the DNS from returning its IPv6 address from the corporate DNS.
Step 4: Client sends packets to server
Now after the client machine has the address of the application server, it starts sending data packets to this server. The packets are sent to the UAG DirectAccess NAT64 since all IPv6 addresses that are included in the NAT64 prefix are routed to UAG DirectAccess.
image

Step 5: NAT64 forwards the packet using IPv4
NAT64 receives the data package and tries to determine the IPv4 address that is associated with the destination IPv6 address. Then it creates a new IPv4 packet that has the same payload and sends it to the application server.
For the application server, the origin of the IPv4 data packet is the UAG server. If UAG DirectAccess is deployed in high availability and scalability mode on an array with integrated Windows Network Load Balancing (NLB), the packet’s origin would be the internal device IPv4 address of the node that handled the traffic. In that case, when the application server replies to this packet, it will reach the node that interacts with the client. image


Meir Mendelovich
Senior Program Manager, UAG Product Group


Considerations When Using Ping to Troubleshoot DirectAccess Connectivity Issues

Tom's another excellent aticle about "Considerations When Using Ping to Troubleshoot DirectAccess Connectivity Issues".Click here.

Recommended Network Adapter Configuration for Forefront UAG Servers

A high-level overview of network adapter configuration best practice is provided below:
  • The network adapter name used within the operating system should be changed to closely match the associated TMG network name. This clarifies assignment and improves supportability.
  • Only one network adapter should be configured with a default gateway.
  • Only one network adapter should be defined with DNS servers.
  • Unused or unnecessary bindings should be removed from all adapters, where possible, to improve security.
  • The default bind order should be amended to define a specific customised order.
Based upon these best practices, the configuration shown below is a tried and tested approach that can be used as part of a Forefront UAG deployment.
Configuration Step 1 – Rename Network Adapters:
Rename all network adapters to descriptive names that ideally match the connection type and UAG wizard/console names. For example:
UAG adapter connected to the trusted network: Internal NetworkUAG adapter connected to the untrusted network: External Network
Tip: Matching the names is not essential; it just makes mapping networks between UAG, TMG and Windows much easier when troubleshooting…

Configuration Step 2 – Configure Network Adapters:
The Internal Network adapter will normally be connected to your trusted environment. This could be your actual internal network (LAN) or could be a private DMZ (perimeter network) if using an intranet/back firewall.
Internal Network Adapter
  • Default Gateway should not be defined
  • DNS Servers should be defined
  • Client for Microsoft Networks binding – Enabled
  • File and Print Sharing for Microsoft Networks binding – Enabled
  • Register this connection’s address in DNS – Enabled
  • Enable LMHOSTS Lookup – Disabled
  • NetBIOS over TCP/IP – Default
The External Network adapter will normally be connected to your untrusted environment. This could be your actual Internet connection if using an edge deployment, or could be a public DMZ (perimeter network) if using an existing edge/front firewall.
External Network Adapter
  • Default Gateway should be defined
  • DNS Servers should not be defined
  • Client for Microsoft Networks binding – Disabled
  • File and Print Sharing for Microsoft Networks binding – Disabled
  • Register this connection’s address in DNS – Disabled
  • Enable LMHOSTS Lookup – Disabled
  • NetBIOS over TCP/IP – Disabled
Please Note: The 'File and Print Sharing for Microsoft Networks' binding on the TMG internal adapter is left at the default settings of Enabled on the TMG Internal Network adapter. This allows for the use of the Internal Network adapter for intra-array services when using a Forefront UAG array.
Configuration Step 3 – Amend Bind Order:
Edit the network adapter bind order to place the Internal Network adapter at the top (highest) position and the External Network at the bottom (lowest) position. For example:
Internal Network (Highest)…others…
External Network (Lowest)
Configuration Step 4 – Run the UAG Network Interfaces Wizard:
You should now run the UAG Network Interfaces wizard, and assign the network adapters to their respective Internal and External connection types/roles.
Important! As you have configured the default gateway on the External Network adapter, it is necessary to add static routes to define internal network subnets that are reached via the Internal Network adapter but located behind routers (including VLANs on layer 3 switches) on the internal network. The use of multiple default gateways is not supported and static routes are the recommended solution. Once you have defined the appropriate static routes, you will then need to run the UAG Network Interfaces wizard to add the new subnets (called address ranges) to the internal network definition; these will consequently be inherited by TMG and allow correct traffic flow…
This article was originally written by: Jason Jones

10/01/2012

What is the Certutil ?          from Technet

Certutil

Certutil.exe is a command-line program that is installed as part of Certificate Services in the Windows Server 2003/2008 family.
You can also obtain Certutil.exe by downloading and installing the Windows Server 2003 Administration Tools Pack (http://go.microsoft.com/fwlink/?LinkID=8136).
You can use Certutil.exe to dump and display certification authority (CA) configuration information, configure Certificate Services, back up and restore CA components, and verify certificates, key pairs, and certificate chains.
you can use this tool on the command-line and for other parameters;
 
certutil /?
 
Let use cetutil for; configuring a Certification Authority (CA)
           
Configuring a Certification Authority (CA) with Certutil tool.
You can use certutil to perform a number of CA configuration tasks.
To view the syntax for a specific task, click a task:

To display CA property type information

Syntax
certutil-capropinfo[-gmt] [-seconds] [-v] [-config CAMachineName\CAName]
Parameters
-capropinfo
Displays CA property type information.
-gmt
Displays time as Greenwich mean time.
-seconds
Displays time with seconds and milliseconds.
-v
Specifies verbose output.
-config CAMachineName \ CAName
processes the operation by using the CA specified in the configuration string (that is, CAMachineName\CAName).
-?
Displays a list of certutil commands.
Remarks
  • You must specify the CAComputerName or CAName in -config CAComputerName\CAName. Otherwise, the Select Certificate Authority dialog box appears and displays a list of all CAs that are available.
  • If you use -config - instead of -config CAComputerName\CAName, the operation is processed using the default CA.

To display the configuration string for a CA

Syntax
certutil-getconfig[-gmt] [-seconds] [-v] [-config CAMachineName\CAName]
Parameters
-getconfig
Retrieves the default configuration string.
-gmt
Displays time as Greenwich mean time.
-seconds
Displays time with seconds and milliseconds.
-v
Specifies verbose output.
-config CAMachineName \ CAName
processes the operation by using the CA specified in the configuration string (that is, CAMachineName\CAName).
-?
Displays a list of certutil commands.
Remarks
  • You must specify the CAComputerName or CAName in -config CAComputerName\CAName. Otherwise, the Select Certificate Authority dialog box appears and displays a list of all CAs that are available.
  • If you use -config - instead of -config CAComputerName\CAName, the operation is processed using the default CA.

To create or delete the standard set of virtual roots and file shares for the Certificate Services Web server

Syntax
certutil-vroot[-gmt] [-seconds] [-v] [delete]
Parameters
-vroot
Creates the virtual roots for the Certificate Services Web server.
-gmt
Displays time as Greenwich mean time.
-seconds
Displays time with seconds and milliseconds.
-v
Specifies verbose output.
delete
Deletes the virtual roots for the Certificate Services Web server.
-?
Displays a list of certutil commands.
Remarks
  • If active server pages (ASP) is not enabled, this command enables ASP.
  • If you installed the CA Web enrollment pages before installing IIS, the required virtual roots are not created. To create the virtual roots after installing IIS, at a command prompt, type:

    "certutil -vroot"

    This command does not install the Web enrollment pages. Instead, it creates the IIS virtual roots that point to the Web enrollment pages, CA certificate, certificate revocation lists (CRLs), and enrollment controls (that is, xenroll.dll and scrdenrl.dll).

To display CA information

Syntax
certutil-cainfo[-f] [-gmt] [-seconds] [-split] [-v] [-config CAMachineName\CAName] [InfoName]
Parameters
-cainfo
Displays CA information.
-f
Overwrites existing files or keys.
-gmt
Displays time as Greenwich mean time.
-seconds
Displays time with seconds and milliseconds.
-split
Splits the embedded Abstract Syntax Notation One (ASN.1) elements, and saves them to files.
-v
Specifies verbose output.
-config CAMachineName \ CAName
processes the operation by using the CA specified in the configuration string (that is, CAMachineName\CAName).
InfoName
Specifies the CA information that you want to display. Use one of the values in the following table.

ValueDescription
fileDisplays information about the file version.
productDisplays the product version.
exitcountDisplays the exit module count.
exit [Index]Displays the exit module description.
policyDisplays the policy module description.
nameDisplays the CA name.
sanitizednameDisplays the sanitized CA name.
sharedfolderDisplays the shared folder.
error1ErrorCodeDisplays the error code message in the local language. For ErrorCode, specify the error code that you want to retrieve.
error2ErrorCodeDisplays the error code message and the error code in the local language. For ErrorCode, specify the error code that you want to retrieve.
typeDisplays the CA type.
infoDisplays the CA info.
parentDisplays the parent CA.
certcountDisplays the CA certificate count.
xchgcountDisplays the CA Exchange certificate count.
kracountDisplays the number of key recovery agent (KRA) certificates.
krausedDisplays the number of KRA certificate that are being used.
propidmaxDisplays maximum CA PropID.
certstate [Index]Displays CA certificate status.
certstatuscode [Index]Displays CA certificate verification status.
crlstate [Index]Displays a certificate revocation list (CRL).
krastate [Index]Displays a KRA certificate.
crossstate+ [Index]Forward cross-certification.
crossstate- [Index]Backward cross-certification.
cert [Index]Displays a CA certificate.
certchain [Index]Displays a CA certificate chain.
certcrlchain [Index]Displays a CA certificate chain with CRLs.
xchg [Index]Displays a CA exchange certificate.
xchgchain [Index]Displays a CA exchange certificate chain.
xchgcrlchain [Index]Displays a CA exchange certificate chain with CRLs.
kra [Index]Displays a KRA certificate.
cross+ [Index]Forward cross-certification.
cross- [Index]Backwards cross-certification.
crl [Index]Displays a base CRL.
deltacrl [Index]Displays a delta CRL.
crlstatus [Index]Displays CRL publish status.
deltacrlstatus [Index]Displays delta CRL publish status.
dnsDisplays the DNS name.
roleDisplays role separation.
adsDisplays Advanced Server.
templatesDisplays the templates.
-?
Displays a list of certutil commands.
Remarks
  • You must specify the CAComputerName or CAName in -config CAComputerName\CAName. Otherwise, the Select Certificate Authority dialog box appears and displays a list of all CAs that are available.
  • If you use -config - instead of -config CAComputerName\CAName, the operation is processed using the default CA.
Examples
To display CA information, type:
certutil -cainfo
To display a CA certificate state disposition, type:
certutil -cainfo certstate
To display CRL information, type:
certutil -cainfo crlstate

To determine whether a CA has been renewed

Syntax
certutil-cainfo[-f] [-gmt] [-seconds] [-split] [-v] [-config CAMachineName\CAName] [certstate]
Parameters
-cainfo
Displays CA information.
-f
Overwrites existing files or keys.
-gmt
Displays time as Greenwich mean time.
-seconds
Displays time with seconds and milliseconds.
-split
Splits the embedded Abstract Syntax Notation One (ASN.1) elements, and saves them to files.
-v
Specifies verbose output.
-config CAMachineName \ CAName
processes the operation by using the CA specified in the configuration string (that is, CAMachineName\CAName).
certstate
Returns a LONG containing a certificate state disposition.
-?
Displays a list of certutil commands.
Remarks
  • You must specify the CAComputerName or CAName in -config CAComputerName\CAName. Otherwise, the Select Certificate Authority dialog box appears and displays a list of all CAs that are available.
  • If you use -config - instead of -config CAComputerName\CAName, the operation is processed using the default CA.
  • If the CA's index is greater than 0, the CA certificate has been renewed. The command output displays the index information.
  • If one of the older CA certificates expires and is regenerated by using the existing key, CRLs are not published for that CA key. If the CA has never been renewed for a new key, this prevents CRL generation. If you generate and publish a new CRL, you will not solve this problem, but you can use the CRL to help confirm the condition. To force the generation and publication a CRL, type:

    certutil -crl
  • The update for this condition is provided in Windows 2000 Service Pack 3.
Examples
To display a CA certificate state disposition, type:
certutil -cainfo certstate

To change the length of the validity period for certificates issued from a CA

Syntax
certutil-setreg[-user] [-gmt] [-seconds] [-v] HKLM\system\currentcontrolset\services\certsvc\configuration[{\CAName | \ca}]\ValidityPeriod{"days" | "weeks" | "months" | "years"}
certutil-setreg[-user] [-gmt] [-seconds] [-v] HKLM\system\currentcontrolset\services\certsvc\configuration[{\CAName | \ca}]\ValidityPeriodUnits"UnitValue"
Parameters
-setreg
Sets or edits the registry key value.
-user
Uses the HKEY_CURRENT_USER keys or certificate store.
-gmt
Displays time as Greenwich mean time.
-seconds
Displays time with seconds and milliseconds.
-v
Specifies verbose output.
HKLM\system\currentcontrolset\services\certsvc\configuration\
Specifies the path to the ValidityPeriod and ValidityPeriodUnits registry keys.
CAName
Specifies the name of the CA.
ca
Specifies the default CA on the local computer.
\ValidityPeriod{ "days"| "weeks"| "months"| "years"}
Sets the period of time that you want the certificate to be valid. Specify days, weeks, months, or years. Wrap the time period in quotation marks.
\ValidityPeriodUnits " UnitValue "
Sets the numeric value for ValidityPeriod.
-?
Displays a list of certutil commands.
Caution
  • Incorrectly editing the registry may severely damage your system. Before making changes to the registry, you should back up any valued data on the computer.
Note
Examples
You can set an enterprise qualified subordinate CA to have a different certificate validity period than the parent CA. On the CA computer that is issuing the subordinate CA certificate, type the following commands to set the validity period to three months:
certutil -setreg ca\ValidityPeriod "months"
certutil -setreg ca\ValidityPeriodUnits "3"

To force a CA to include expired certificates in future base and delta CRLs

Syntax
certutil-setreg[-user] [-gmt] [-seconds] [-v] ca\CRLFlags+CRLF_PUBLISH_EXPIRED_CERT_CRLS
Parameters
-setreg
Sets or edits the registry key value.
-user
Uses the HKEY_CURRENT_USER keys or certificate store.
-gmt
Displays time as Greenwich mean time.
-seconds
Displays time with seconds and milliseconds.
-v
Specifies verbose output.
ca
Specifies the CA registry key.
CRLFlags
Specifies the registry value name.
CRLF_PUBLISH_EXPIRED_CERT_CRLS
Specifies the new numeric or string registry value.
-?
Displays a list of certutil commands.
Remarks
  • You must restart the certification authority for this change to take effect. For more information on restarting Certificate Services, see Start, stop, pause, resume, or restart a service.
  • With this command, you can verify the revocation status of a time-stamped certificate that has expired.
  • If a numeric registry value starts with a plus sign (+) or a dash (-), the bits specified in the new value are set or cleared in the existing registry value.
  • If a string registry value starts with a plus sign (+) or a dash (-) and the existing value is a REG_MULTI_SZ value, the string value is either added to or removed from the existing registry value.

To configure a CA to issue certificates beyond the default two year limit

Syntax
certutil-setreg[-user] [-gmt] [-seconds] [-v] ca\ValidityPeriod"years"
certutil-setregca\ValidityPeriodUnits"2"
Parameters
-setreg
Sets or edits the registry key value.
-user
Uses the HKEY_CURRENT_USER keys or certificate store.
-gmt
Displays time as Greenwich mean time.
-seconds
Displays time with seconds and milliseconds.
-v
Specifies verbose output.
ca\ValidityPeriod "years"
Sets the validity length of the certificate to years.
ca\ValidityPeriodUnits "2"
Sets the "years" validity period value to two.
-?
Displays a list of certutil commands.
Caution
  • Incorrectly editing the registry may severely damage your system. Before making changes to the registry, you should back up any valued data on the computer.
Note

To increase the session limit on the CA database

Syntax
certutil-setreg[-user] [-gmt] [-seconds] [-v] dbsessioncount 30
Parameters
-setreg
Sets or edits the registry key value.
-user
Uses the HKEY_CURRENT_USER keys or certificate store.
-gmt
Displays time as Greenwich mean time.
-seconds
Displays time with seconds and milliseconds.
-v
Specifies verbose output.
dbsessioncount 30
Specifies the new session limit.
-?
Displays a list of certutil commands.
Caution
  • Incorrectly editing the registry may severely damage your system. Before making changes to the registry, you should back up any valued data on the computer.
Remarks

To disable or restore the enforcement of the distinguished name length on the CA

Syntax
certutil-setreg[-user] [-gmt] [-seconds] [-v] ca\ENFORCEX500NAMELENGTHS {0 | 1}
Parameters
-setreg
Sets or edits the specified registry value.
-user
Uses the HKEY_CURRENT_USER keys or certificate store.
-gmt
Displays time as Greenwich mean time.
-seconds
Displays time with seconds and milliseconds.
-v
Specifies verbose output.
ca \ ENFORCEX500NAMELENGTHS
Specifies the path to the REG_DWORD\ENFORCEX500NAMELENGTHS registry value.
{ 0| 1}
Specifies whether to disable (specify 0) or restore (specify 1) the default REG_DWORD\ENFORCEX500NAMELENGTHS registry value.
-?
Displays a list of certutil commands.
Remarks
  • You must restart the certification authority for this change to take effect. For more information on restarting Certificate Services, see Start, stop, pause, resume, or restart a service.
  • Use this command in situations where the existing subject is okay, but the request is rejected by the certificate server.

    Examples
To disable the organizational unit length enforcement on the server, type:
certutil -setreg ca\enforceX500namelengths 0
To restore the default REG_DWORD\ENFORCEX500NAMELENGTHS registry value, type:
certutil -setreg ca\enforceX500namelengths 1